GROWING TALL BEARDED IRISES IN WET CONDITIONS UPDATED MARCH 2025
WEATHER
The weather over the winter has been extremely wet in many parts of the country. During the last month it has started to dry out here in the north, although the ground is still cold with regular nigh-time frosts. I make no apology for re-issuing the article we published last year, with some minor tweaks. It is important to understand why growing Tall Bearded Irises in Wet Conditions can both be tricky and also fatal to your plants.
So much of the work with irises boils down to regular routine. maintenance. And, if you can keep on top of this, it will pay dividends during the all too frenetic growing season. Understand why you need get on top of your work with irises, and do so quickly.
Work Plan – in priority order:
1) Weeds
Weed growth has been spectacular over a winter that has been largely mild, but extremely wet. These are ideal conditions for vigorous perennial weeds. So, if you can, it is really important to try to remove as many of the perennial weeds as you can at this point in the year, and it will pay dividends later. Word of caution, you need to be extremely careful not to snap iris shoots that will form spikes in the next six weeks. Extreme care is necessary!
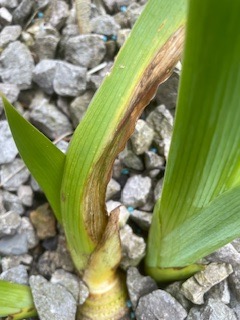
2) Plant Hygiene – Remove all brown leaves from the base of your irises
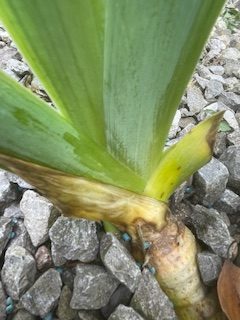
In recent years I have grown to recognise the importance of good plant hygiene with bearded irises. This is all the more important following the prolonged wet period before Christmas. Even though things have started to dry up since, it is just as important to remove ALL dead and discoloured leaves around the base of each rhizome.
It is vital not to skimp this, as I am in no doubt that the spores of the leaf spot fungus thrive in the detritus of dead and dried up leaves at the rhizome base. Depending on your agility, and the density of planting, this is best done standing up, although I must admit to resorting to finishing the work on my hands and knees!
This work is fiddly and best done with a stout sharp knife and sharp secateurs.
Once your plants are clean, this will reduce the likelihood of leaf spot later, another condition that is aggravated by damp conditions and dense planting. Try to get on with it ow before the irises start to throw flower spikes. At this point things get much trickier and you can do more harm than good.
3) Remove/Cut Back Any Discoloured Leaves
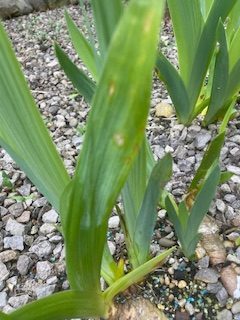
It is essential to cut back leaves that are brown, discoloured , or show any sign of leaf spot. Cut back to clean green leaf material and be diligent in the way you do this. Again, damp wet conditions with rising temperatures are perfect conditions for leaf spot. There are anti -fungal remedies, but please contact us for further information.
4) Still Time to Tidy Up and Cut Back Old Rhizomes
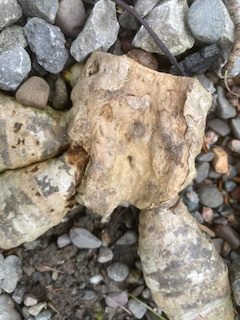
After you have tackled the weeds, do remember that there is still time to cut out any old rhizomes. However this comes with a word of warning, and with new plant growth ever more vigorous, extreme care is needed not to snap choice flowering material in the process.
At the same time it is well worth checking the health of the rhizomes as the sodden ground can definitely increase the likelihood of rhizome rot. It is important to cut out any rhizomes that are soggy/soft; this will prevent the spread of rot and may well save your plants.
Do remember that irises are generally tough as nails, but they are particularly susceptible to rot in ground that is sodden. Conditions for rot are ideal and have been so during the last six months.
5) Tidying Up/Iris Division
Always be alert to the possibility of iris division. Little and often is best using the Doddington Method, and if you want to do something this Spring, you still have time, but be sparing and save your best efforts until after your irises have flowered. Probably still viable here in the north where you have a little more time.
6) Feed your Irises
Finally, it is still not too late to get the bonemeal on before the irises flower in May/June. And, if you have not done this already, you should get cracking and be generous with a good handful per iris clump, and more if the clumps are large. It is important to work the bonemeal into the ground around each plant which is another reason why the weeding needs to be done first. Avoid putting it on top of the rhizomes.
Where foxes are a problem remember that a granular seaweed feed worked into the ground is an effective alternative.
7) Slugs
No iris planting ‘do’s and don’ts’ is ever complete without a slug/snail warning. Again, recent wet mild conditions have meant that slugs have been active for some time. If you have followed the earlier steps, you will be aware whether damage is evident or not and I again make no apology for repeating my warning verbatim.
Once the weather arms up and. we start to get more regular rain, remember that the soggy conditions that follow are ideal for slugs. Be vigilant, and remember it is the small black slug that does most damage.
If slugs are evident (and remember you may not be aware that they are), use an organic product ‘Ferrimax’ approved by RHS or ‘Sluxx’, the product we use. Check websites for availability and look for products using ferric phosphate and avoid using those containing Metaldehyde.
8) Summary
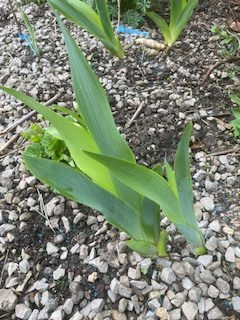
Wet Conditions All Shipshape
Growing Irises in Wet Conditions is never straightforward. There are things you must do to ensure that your bearded irises stay healthy. If your plant hygiene is good, this is the best deterrent against disease. Normally, bearded irises are tough as nails and will last for years. Sodden ground and persistent rain provide ideal conditions for iris rot, the main killer of bearded irises.
SIGN UP FOR FUTURE ADVICE
We send out twice-yearly newsletters or when conditions are particularly challenging. If you would like to receive these please subscribe and join our growing list of subscribers (and feel free to pass on to others).